5 Soccer Throw-in Drills (2024 Update)
Soccer is a game of fine margins, with many games decided by a single mistake, a moment of individual brilliance, or an astute tactical change.
Improved standards across the world’s top leagues mean that securing three points against a so-called “weaker side” is no longer a sure thing, even for the very best teams.
From low-block, five-player backlines to high-pressing front threes, every professional team works within a rigid system, driven by analysis and statistics.
In the battle for fine margins, coaches look for every opportunity to gain an edge in a game.
The Importance of Throw-ins
Throw-ins in soccer have long been overlooked as key set pieces until very recently.
Over the past decade, teams have increased focus on data and analytics in the game.
Soccer strategists began to recognize how critical throw-ins were in retaining possession, creating transitions, and building attacks.
This switch of focus is exemplified by Liverpool’s appointment of throw-in specialist, Thomas Gronnamark, in 2018. At the time of his arrival, opposition fans mocked Liverpool and Jurgen Klopp for hiring a coach to oversee such a “mundane” aspect of the game.
But Gronnemark’s impact was immediately felt, helping Liverpool turn a 45.4% thrown-in possession retention rate to 68.4%.
This jump in numbers took them from 18th to 1st in the Premier League for this statistic!
Gronnemark claims that in any game, there are around 40 to 60 throw-ins and the majority of teams turn over possession half of the time. In an era where possession and transitions are so important, it’s impossible to ignore this statistic.
Here are 3 simple soccer throw-in drills to help keep possession and give your team the edge.
5 Soccer Throw-In Drills
1. First-Touch & Technique
In a live game, passes aren’t always crisp or accurate due to fatigue, bobbly surfaces, or pressure from the opponent.
It’s critical to drill throwing, first-touch, and passing techniques to ensure the movements become muscle memory.
Even in high-pressure environments, well-drilled teams can fall back on their fundamentals, minimizing mistakes and maximizing opportunities to retain possession.
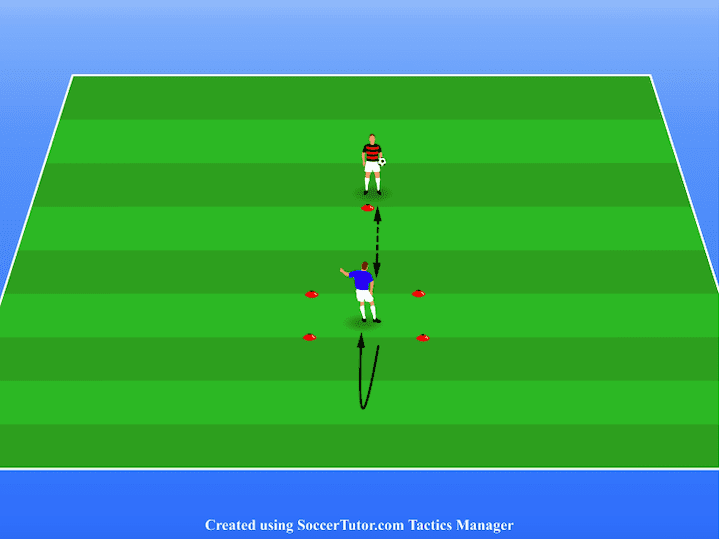
This drill mimics the basic movements of a throw-in and allows players to practice throwing, receiving, and passing the ball, using various parts of their body.
Read: How to do a Soccer Throw In With Power and Accuracy (6-Step Guide)
Key Focuses:
- Throwing technique at various distances
- Off the ball movement to lose a defender
- First touch
- Chest control
- One-touch passing Two-touch passing
How to Run it:
1. Create a small, four-cone square grid for the receiver.
2. The thrower stands 10 yards away with the ball in hand.
3. Receiver moves away from the thrower before checking back into the grid to receive the pass.
4. The thrower plays the ball to the feet of the receiver.
5. The receiver takes one touch to control the ball, then plays a return pass to the thrower.
6. Repeat this 5 times, then switch to other techniques for 5 repetitions of each
7. Consider increasing the distance to replicate real-game scenarios.
Note: Other useful techniques to practice include:
- Chest control and return pass
- Knee control and return pass
- First-time return pass
- Left-foot only
- Right-foot only
2. Quick Turn, One-Touch Switch
The first or even second passes aren’t usually the most problematic after a throw-in.
That’s why it’s important to have pre-arranged passing sequences or triangles in place to retain possession once the ball re-enters the field of play.
The thrower is the key player in keeping the ball as they are typically left unmarked.
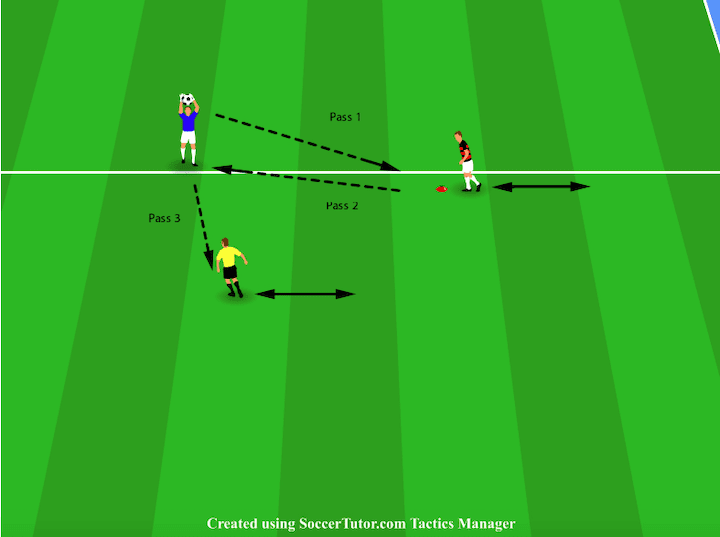
This simple drill creates a basic triangle between the thrower and two outfield players, and can be very effective in playing around a dogged opposition.
Key Focuses:
- Positioning
- Movement and checking your run
- One-touch passing
- Passing and moving
How to Run it:
1. One player stands 10 yards from the thrower, along the sideline.
2. The other outfielder stands 10 yards from the thrower toward the center of the field.
3. The wide player fakes running down the line before checking, turning, and receiving a throw-in to feet.
4. The receiver plays a first-time return pass to the thrower.
5. The central player then fakes running forward before checking their run and heading back toward the thrower.
6. The thrower passes the ball to the central player who then opens their body toward the opposite wing, ready to switch the play.
7. If numbers allow it, consider placing another player on the opposite wing to receive the crossfield pass.
3. Pin the Defender to Passing Triangle
Some teams press intensely when you have a throw-in, marking all players tightly, and allowing no gaps.
This is where hold-up skills and learning to pin a defender are crucial.
A player who can receive the ball while being marked is invaluable, ensuring the thrower always has an outlet.
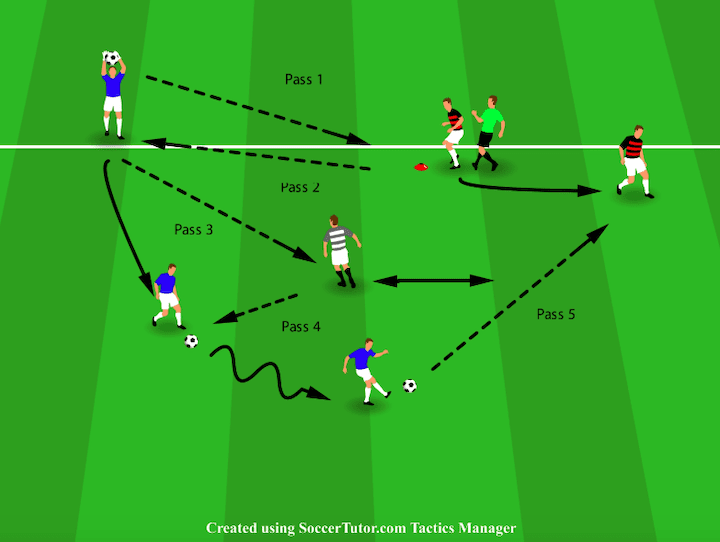
This multifaceted drill focuses on holding off the defender but also involves a quick passing sequence that helps your team work their way out of a tight space.
Key Focuses:
- Hold up skills
- Triangle positioning
- One or two-touch passing
How to Run it:
1. One player stands 10 yards from the thrower along the sideline, with a defender at their back.
2. Another player stands around 5 yards from the sideline, and 10 yards from the thrower, creating a triangle.
3. The thrower plays the ball to the feet of the player with the defender at their back.
4. The receiver lowers their center of gravity and shields the defender away from the ball.
5. The defender should play passively but apply some pressure, ensuring the receiver can practice holding the ball up -- this pressure can increase as the drill progresses.
6. The receiver takes one touch to control, plays a return pass to the thrower, then spins down the line.
7. The thrower then plays a one-two pass with the infield player but receives the return pass on the move toward the center of the field, breaking out of the confined space at speed.
8. After receiving the return pass, the player should then play a line-splitting pass to the teammate along the wing.
9. Optional: The thrower and second receiver sprint into the penalty box to get on the end of a cross from the winger.
4. Sideline Throw Routine
Sometimes, the simplest routines are the most effective.
Essentially, the first priority with any throw-in is to retain possession. You don’t want to give the ball away cheaply.
This is a straightforward but useful routine that works consistently.
The objective is to create space down the line for the receiver.
The thrower remains available for a return pass if necessary.

Key Focuses:
Clever movement
Change of direction
Fast acceleration
Good first-touch
Hold up play
How to Run it:
Unlike with other routines, you want to leave the sideline free of players.
The receiver stands next to a defender infield, around 10 to 15 yards from the thrower.
After some side-to-side movement, the receiver runs toward the thrower as if to receive the ball.
The thrower makes a pump fake (pretends to throw the ball).
At this moment, the receiver quickly changes direction and sprints down the line.
The thrower passes the ball over the receiver’s head and into their path.
The receiver has two options:
Since this isn’t a live game scenario, the second option is typically best for drilling. However, make sure to tell your players they have multiple options.
a. Continue running down the line to launch an attack.
b. Hold off the defender, turn back, and play a return pass to the thrower.
5. Throwing Pairs
The mechanics of throw-ins are important.
It’s a technical skill that many young players get wrong, resulting in foul throws during games.
However, once players learn the technique, it becomes muscle memory.
More often than not, the most important aspect of nailing a throw-in comes from the receiver.
This drill works on the standard throwing mechanics but also allows the receiver to practice controlling the ball from various types of throws.

Key Focuses:
Basic throwing technique
Movement
First-touch
Ball control (with feet, knees, head, and chest)
Communication
How to Run it:
Create a small square cone grid (approximately 5 x 5 yards).
Place cones five yards from either end of the grid.
Divide the team into pairs.
If you have a lot of players, create multiple grids for each pair.
One player starts as the thrower and the other begins as the receiver.
The receiver stands outside the grid at the starter cone. The thrower stands outside the grid at the other cone.
The receiver begins the drill by sprinting into the square grid.
The thrower uses the correct technique to pass the ball to the receiver's feet.
The receiver takes one touch to control the ball and then plays a return pass.
As soon as they make the pass, the receiver sprints back to the starting cone, then back to the grid for another throw.
Practice different types of throws, touches, and passes. For example, throw the ball to the receiver’s chest, aim it toward their knees, or throw it toward their head. The receiver then practices taking touches and passing using different parts of the body.
After practicing multiple techniques, the players switch roles.
Conclusion
Soccer throw-in drills are essential in the modern game, especially for possession-based teams.
Every set piece provides an opportunity to break the lines or create a transition that can lead to a scoring chance.
Focusing on the finer details, like throw-ins, helps your team gain the inches that can make the difference between winning and losing.
Try out these 3 possession-oriented drills to enable your team to work its way out of congested areas and take advantage of every throw-in.
The emphasis on passing, moving, and creating triangles will also help with other aspects of the game.

