15 Soccer Passing Drills (2024 Update)
Using the best soccer passing drills available is essential for all coaches who want to develop a winning team.
The goal must be to develop teams who are able to keep possession and advance the soccer ball strategically down field with patience and skill.
To accomplish this, all players must be able to do two things...
- Read the game and know which pass to make.
- Be able to execute the pass.
Use the 15 soccer passing drills below to work develop your team's ability to read the game and be able to make the correct pass.
All drills are suitable for a wide variety of age groups and skill levels.
15 Soccer Passing Drills
1. 1-In 1-Out
How the Drill Works:
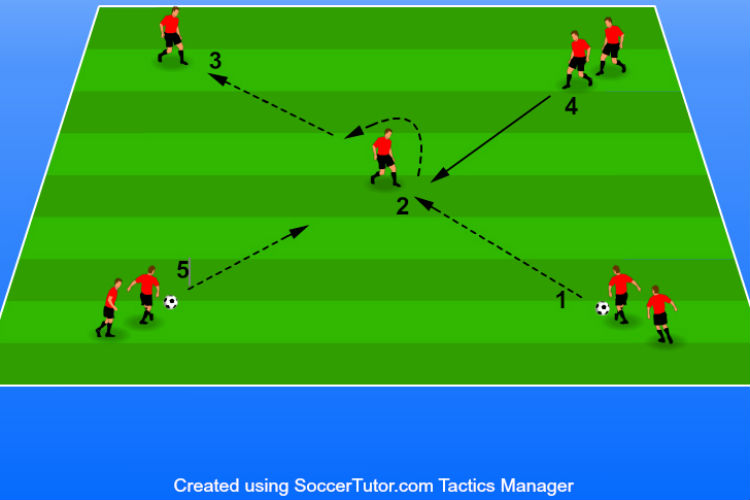
Players separate themselves evenly into four lines, forming a square shape. Players pass the ball to the player in the middle of the square who will then turn, 180 degrees, pass the ball to the front of the next line. The player who turns and passes then follows their pass and goes to the back of the line. The player who passed the ball to the middle player, then runs into the middle to repeat the process.
Purpose:
This soccer passing drill is suitable for almost any age level, focusing on passing, receiving, and turning skills. Great warmup drill for players to pass and move.
Setup:
- The players are divided in four lines that form a square, with one player starting in the middle of the square.
- Two soccer balls are needed. Give one of the two balls to each of the two lines that are on the same side of the square.
- Decide on set time for each round.
Instructions:
- The passing pattern starts with one of the soccer balls being passed to the player in the middle.
- The player in the middle receives the pass, turns 180 degrees, passes to the opposite line, and follows the pass to go to the back of that line.
- After the first pass, the player who passed the ball then runs into the middle to receive the second soccer ball. This player will then receive the ball, turn 180 degrees, pass to the opposite line, and follow the pass to the back of the line. The same process as the first player.
- This process repeats itself for the decided upon amount of time.
Variations:
One touch – Depending on the age of the players and their skills, have the players use only one-touch pass in the process.
Weak Foot – Players can only pass, receive, and turn with their weaker foot.
Different Turns – Give players different turns each round (i.e. inside the foot turn, outside the foot turn, etc.)
Coaching Points:
- Stress that players should pass the ball accurately on the ground.
- Excite players to give a pass to their partner that they can handle.
- Encourage players to use the inside of their foot to pass.
- Depending on the age and skill of the players, vary the distance between the lines.
- When working with more developed players, try to increase the tempo and speed of play in order to challenge the players to receive and pass the ball on the run.
2. 4-on-3 Attack
How the Drill Works:
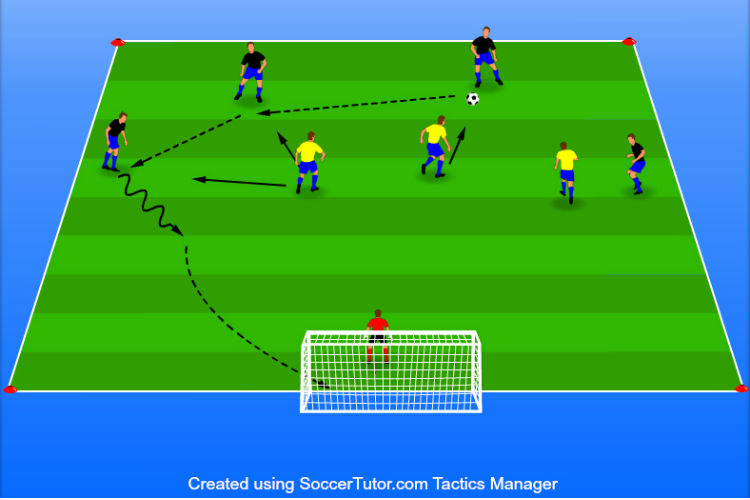
Four players attempt to score on three defenders and a goalkeeper inside the playing area. One full size goal is placed on one end of the playing grid.
Purpose:
Develops players’ passing, dribbling, and decision making in a game-like situation to goal. Players learn to move together and to score when there is a numbers advantage for the offense.
Setup:
- Use several cones to mark a playing grid, about 30x30 yards large.
- Place a full-size goal on one end of the grid.
- Divide the players into two equal number teams and assign a jersey color to each.
- One team should be on the opposite line of the goal and will begin as the offensive team.
- The other team will lineup on each side of the goal posts.
- Place a goalkeeper in the goal.
- All the soccer balls are put on either side of the goal posts with the team starting on defense.
- Four players from the offense line step into the grid.
- Three players from the defensive team step just inside the grid and have one ball with them to pass to the offensive team to start the drill.
- Decide on a time limit for each round and the number of rounds.
Instructions:
- To start the drill, the defensive team passing the ball to any of the four offensive players. As soon as the ball is passed, both teams are live.
- The offensive players receive the ball from the defense and start attacking the three defenders. The offensive players are free to dribble, pass, and move as they attempt to score a goal.
- The three defenders are free to intercept and win the ball from the offensive players as soon as the defenders pass them the ball.
- If the offense scores, the defense intercepts the ball, or the ball goes out-of-bounds, then all players go to the back of their team’s line and new players for each team step into the field.
- A new ball is started again with the three new defenders. The game continues in this manner for a determined amount of time.
- After the set period of time, have the teams switch positions. The offensive team becomes the defensive team and the defensive team becomes the offensive team.
Variations:
Different number of players – Set up 5-on-4, 6-on-5 game, etc. Adjust the playing size according to the number of players. If the offensive team is having a difficult time scoring, add one more offensive player to create a 5-on-3 situation.
Coaching Points:
- Teach the players to attack the defense at speed and make the defenders move in order to create gaps and spaces for offensive players to attack.
- Instruct the players to be decisive with their decisions and to be creative. Players should want to try new skills to give their team the best chance to score.
- Remind players to have an idea of what they want to do with the ball before they get it. Have them keep their eyes up so that they can have a clear picture of the field.
- Challenge the players to find the right time to go 1-on-1 with defenders and when to pass the ball.
- Encourage the defenders to move together and close the ball so that the offense does not have time to shoot. The defenders should constantly move their feet and look to intercept the ball when the opportunity arises.
- Remind the offensive players to work together and to move off one another to create space.
3. Grid Passing
How the Drill Works:
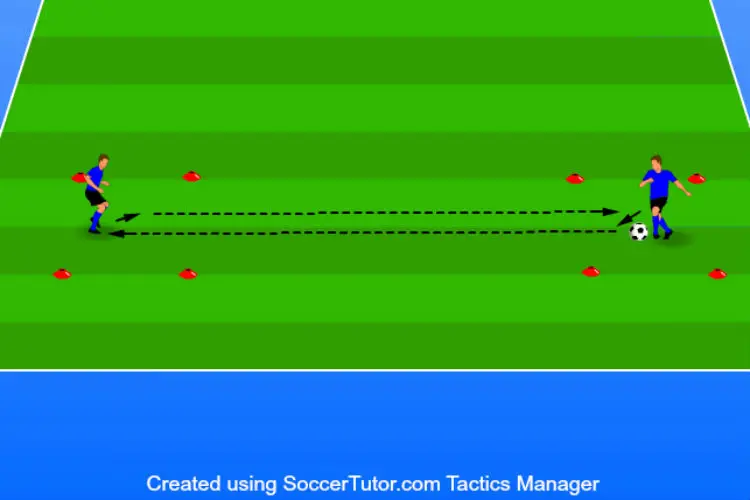
Players partner up and each player works inside their own separate small square of four cones. With one ball, partners exchange passes to each other while staying in their own square. Players must receive and pass the ball within their square. Every time a player’s first touch goes outside of the square, their partner receives one point.
Purpose:
Improves players’ first touch. Forces players to keep their first touch close and to have soft feet. Can be used has a warmup exercise for all ages, or can be used a technical exercise.
Setup:
- Players partner up with one soccer ball per pair.
- Use cones to make two small squares about 3x3 yards big and 10-20 yards apart. Depending on the age and skill level of the players, increase or decrease the distance between the two squares.
- Decide on a period of time for each round.
Instructions:
- One partner begins with the soccer ball and attempts to pass the ball into their partner’s square.
- The partner attempts to receive the pass, inside their square, in one touch. The object is to receive the ball and keep it inside the grid.
- After receiving the pass, the player then attempts to pass the ball back to their partner inside their partner’s square where they will attempt to receive the ball and keep it inside their square. This process is continued for the duration of the game.
- If the receiving player fails to keep their receiving touch inside their square, then the passer gets one point.
- If the passer passes the ball outside of their partner’s square, then the player receiving the missed pass, gets one point.
- No points are awarded if both the pass and receiving touch are good.
- Players are allowed to move outside of their squares, but they are encouraged to control and pass the ball inside their squares.
- The game continues for a set period of time and the partner with the most points at the end of that round, wins the round.
Variations:
Vary the foot part – Have the players use different parts of the foot to pass – inside, outside, instep, etc.
Weak foot – Players can only use their weaker foot to pass, receive, or both.
Chipping the ball – Players attempt to chip the ball directly into their partner’s square. The same rules apply. Space the two squares out more in order to create a more difficult game. Players will have to receive the ball out of the air or on the bounce depending on the flight of the ball.
Juggling – Same rules, but now players must juggle and keep the ball in the air while exchanging passes inside their squares. Keep the squares close to start and put more distance between them as players improve. Give players a juggle touch limit like four, or two, or one-touch for the most advanced players.
Coaching Points:
- Stress passing accuracy over power to the players. Passes should be on the floor and to their partner in the opposite square.
- Teach the players to decrease the time from their first touch to their second touch as they work through the drill. This will increase a player’s ability to play quickly.
- Encourage players to work on both feet when receiving and passing.
- Challenge players to challenge their partners with harder passes. If players are easily keeping their pass inside the square, challenge the players to pass the ball with more space.
4. Guard the Castle
How the Drill Works:
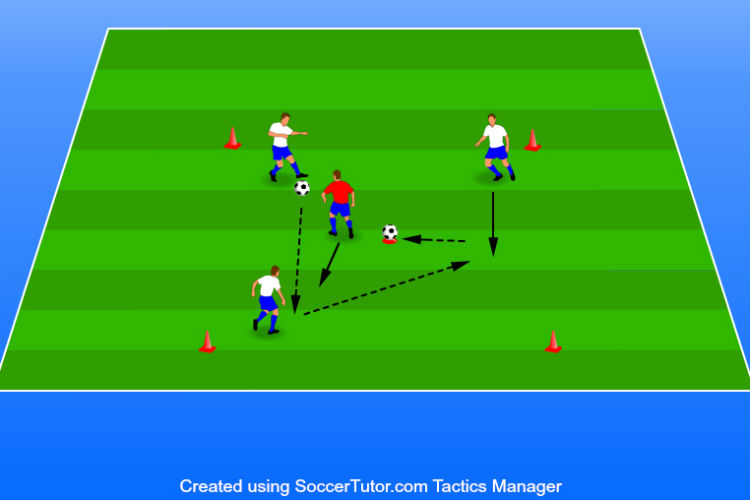
With one soccer ball set on top of a disc cone as the 'castle' in the middle of the designated area, three players attempt to knock over the castle by passing the ball around the one defender who is trying to keep the castle standing.
Purpose:
Works on passing, player movement and angles, and accuracy. A fun drill that can be used as a warmup for more developed players, or a serious game for younger players. Creates a situation where the defense is outnumbered and players must find the best way around the defense.
Setup:
- Divide the team into groups of four players.
- One ball per group of four.
- Three players start on offense with the ball while one player starts as the defender.
- Set up a square-shaped playing area for each group and mark it with four cones. The square should have sides 10 to 15 yards long, depending on the age of the players and skill level. The better the player skill is, the smaller the space can be. Can always adjust as the drill goes.
- Place a disc cone in the center of the square and place a soccer play on top. This will be the 'castle'. If disc cones are unavailable, a tall cone can be used instead.
- Decide on a time limit for each round. 2-3 minutes should be plenty.
Instructions:
- At the start of round, the offensive players begin passes the ball between themselves trying to find an opening to knock the castle down. The offensive players can dribble, pass, and move inside the square.
- While the offense works, the defender moves around the square trying to prevent to castle from being knocked over.
- If the castle gets knocked down, the defender resets the ball and then play continues.
- If the defender wins the ball, or the ball is deflected out-of-bounds, then the ball is given back to the offense and play continues.
- At the end of each round, players rotate positions. The defender becomes an offensive player and one offensive player becomes the new defender.
- Play at least 4 rounds so that every player has to defend.
Variations:
Build a Moat – Set up a small grid inside the playing grid, around the castle (for example, 2x2 yards), where the players are not allowed to step into. This will prevent the players from standing next to the castle, and force them to move around.
Number of passes – Include a number of passes that the offensive players need to complete before attempting to knock down the castle.
1-on-1 – To focus on dribbling skills, have only one offensive player attempting to knock the castle down.
Add more defenders – If 3v1 is too easy, add another defender and go 3v2. Try different combinations to see what works best (for example, 4v2, 5v2, or 5v3).
Coaching Points:
- Encourage the players to constantly keep moving for each other. Better movement between players will create easier chances to knock over the castle.
- Players should keep their heads up and maintain good vision of the playing area. This will help with their decision making and speed of play when the ball comes to them.
- Emphasize that players should work together in order to knock the castle over.
5. Meet the Ball
How the Drill Works:
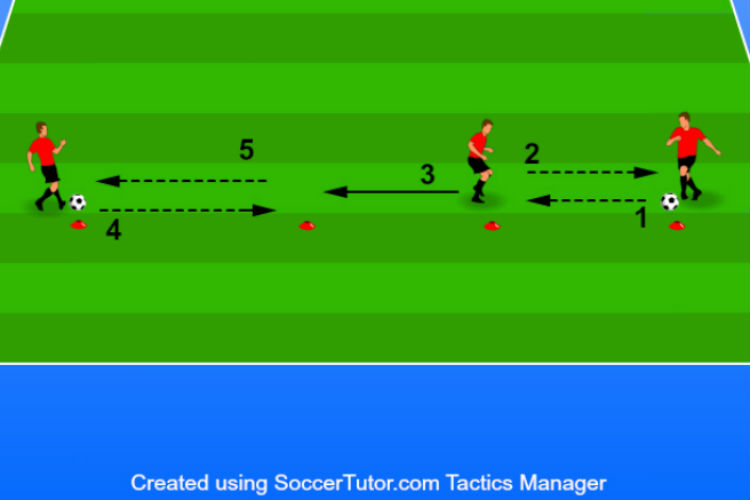
Players separate into groups of three with the two soccer balls. Two players are on the outside with soccer balls while one player is in the middle of the two players. The middle player, alternates receiving passes from the outside players and playing the ball back.
Purpose:
Focuses on passing and receiving skills while moving and meeting the ball.
Setup:
- Divide the team into groups of three players with each group having two soccer balls.
- Lay down 4 cones in a line for each group. The middle cones should be 8-10 feet apart. The outside cones should be 12-15 feet away from the nearest middle cone.
- In each group, two players stand on each of the outside cones with a single soccer ball. The third player stands in between the two middle cones without a soccer ball.
Instructions:
- At the start of the drill, the player in the middle moves towards one of the middle cones. The outside player closest to the cone, passes the ball into the middle player who then receives the ball and passes it back to the outside player in two touches.
- The middle player then turns and moves towards the other cone in the middle to receive a pass from the other player. The middle player receives and passes the ball back to the player who passed it to them.
- The alternating of passes from the outside players to the middle player continues until the middle player has completed 8-10 passes from each of the outside players, or a determined time period is completed.
- Players then switch positions and then repeat the process.
Variations:
Weak foot – Have the players use only their weaker foot to pass.
One-touch pass – The middle players passes the ball back to the outside players in one touch.
Volleys – The outside players start with the soccer balls in their hands and toss the balls, in the air, into the middle player who must return the pass back to them in the air. The middle player can use the inside or laces of their feet to return the pass back to the outside players.
Headers – The middle player must return a lofted toss with their head back to the outside players.
Coaching Points:
- Encourage players to pass the ball with accuracy on the ground to their teammates.
- Stress that players should weight their pass properly so that their teammates can control the ball and play it back.
- Feel free to switch up the type of passes players receive if players are doing well with the simple passes on the ground. Outside players can chip, drive, or toss the balls into the middle player to make it more difficult. Challenge the players.
- Teach the players to use the inside of their foot to pass when passing on the ground.
6. Numbers Passing
How the Drill Works:
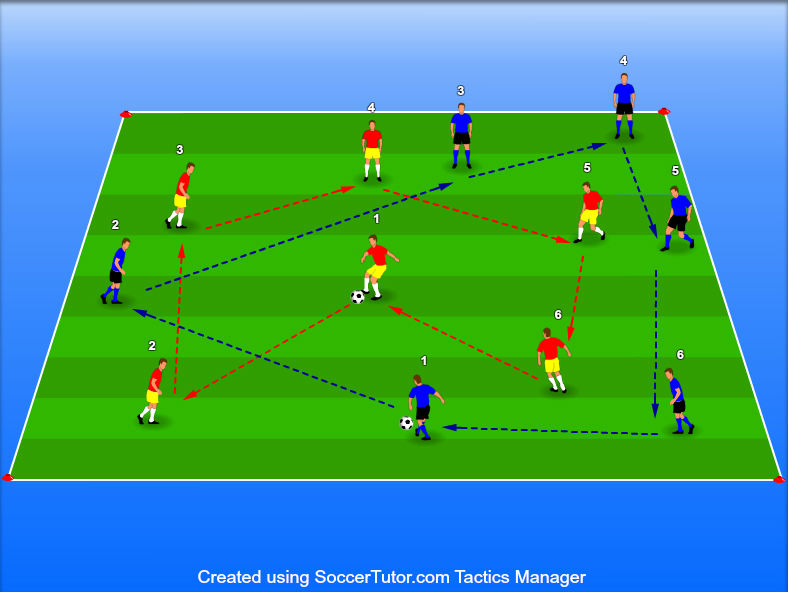
Players are split into two teams of 5-10 players and assigned a number. Inside the playing area, players move and pass the ball in numerical order to each other (1 passes to 2, 2 passes to 3, etc.)
Purpose:
Develop passing accuracy, field awareness, and communication. Players must constantly check the field and communicate with teammates to solve where the next pass must go.
Setup:
- Divide the team into groups of 5-10 players.
- Assign each player with a number ranging from 1 to the number of players in the group.
- Create an 8-12 yard square. This will be the playing area the player must complete the drill in. Increase, or decrease, the space depending on the number of players. The space should be big enough that players are not right on top of each other.
- Players spread out inside the area with one soccer ball starting with the player assigned the number 1.
Instructions:
- To start the drill, player #1 passes to player #2 who is moving inside to area.
- Player #2 then receives the ball and looks to pass to player #3.
- This sequence continues as players constantly move inside the playing area.
- The last player in the sequence then passes the ball back to player #1 and it continues on until the end of the determined period of time.
Variations:
One-touch passing – Players can only use one-touch to pass to their teammates and complete the sequence.
Backwards – The players must complete the sequence backwards.
Two soccer balls – Add two soccer balls into the sequence to give players more touches and challenge their awareness.
Coaching Points:
- Start slow. Can always increase the tempo as players become more comfortable.
- Insist that the players move for the entire time.
- Encourage the players to communicate with one another. Teach players to call for the pass and help teammates find the next pass quickly.
- Instruct players to keep their heads up and maintain good field vision to increase their speed of play.
7. One Touch Pairs Passing
How the Drill Works:
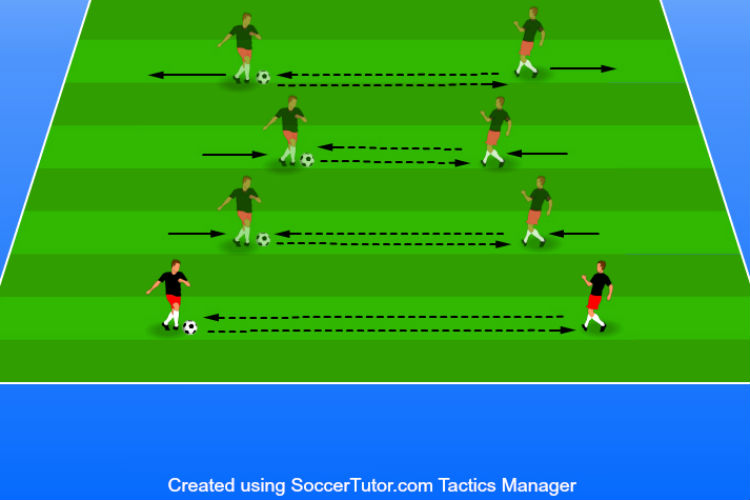
Players divide up into pairs with one ball. Players start at a certain distance apart and begin passing the ball using only one-touch. Every time the ball is passed, players move towards their partners until they get too close, then begin moving backwards after every pass until they get too far away from each other. This process continues as players work on one-touch passes over varied distances.
Purpose:
Develops one-touch passing skills for all age and skill levels. Great for working on passing over varied distances. Players must focus on the weight and accuracy of passing a one-touch pass.
Setup:
- Players partner up with one soccer ball per pair.
- Form a line with one player from each group spread out evenly along it. The partners stand 10-20 yards away from their partner on the line.
- Decide on a time limit that the players will work for.
Instructions:
- Players begin exchanging one-touch passes with their partners.
- Each time a player passes the ball, they move a slowly towards their partner.
- Once partners get too close to each other, they begin slowly moving backwards every time a pass is made until they return to their original distance.
- When pairs arrive back to their original distance, the process is repeated for the remainder of the time period.
Variations:
Weak foot – Players can use their weaker foot only.
Two-touch – If players are having difficulty with one-touch passing, give the players two-touches.
Juggling – For advanced players, the process stays the same, but now players must juggle the ball between each other over varied distances. Start with three or two-touch juggling and then work into one-touch.
Coaching Points:
- Instruct the players to apply the right amount of power when passing to each other. Players should hit the ball harder as they get further away from each other, and softer as they get closer.
- Stress that the players use the inside of their feet when passing.
- Remind the players to focus on hitting the center of the ball so that their passes stay on the ground.
- Start slow. Can always increase the tempo as players become more comfortable.
- Challenge the players to see how many clean passes they can connect to one other.
8. Pass & Overlap
How the Drill Works:
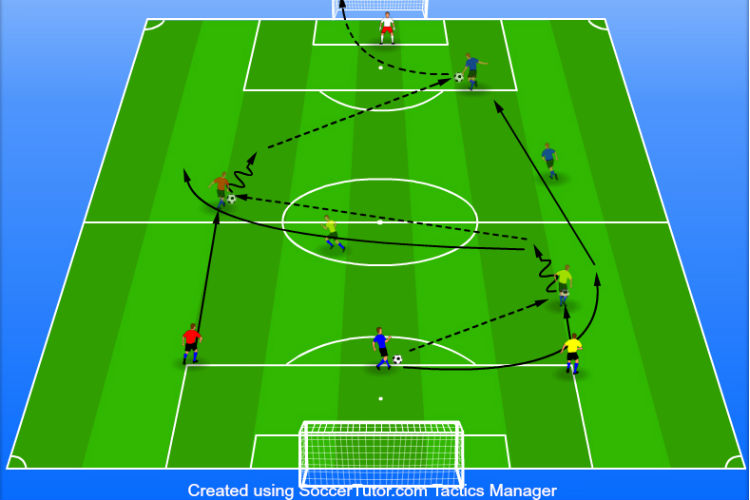
Three players progress up the field by passing and overlapping a teammate until they reach the penalty box on the opposite end of the field. The player who has the ball when entering the penalty box attempts a shot on goal.
Purpose:
Develops players’ ability to pass and dribble while moving at speed. Players are forced to pass the ball into their teammate’s running path and then quickly overlap that player. Players work on receiving a ball on the run and being able to control their first touch while running.
Setup:
- Divide the team into three even lines along the endline.
- Each line should be about 10-15 yards apart depending on the age and skill level of the players.
- Each player in the middle line should start with a ball.
- One player from each line will work together down the field.
- If available, assign a goalkeeper to the goal opposite of the three lines.
Instructions:
- The player in the middle passes the ball ahead to one of their teammates on the left, or the right, and then quickly runs to overlap (run around) the player receiving the pass.
- The receiving player takes a touch while moving forward, passes the ball to the third player, and quickly overlaps that player.
- The process is continued until the ball reaches the opposite penalty box.
- The player who is receiving the ball in the penalty box then attempts to score on the goal.
- When the first group reaches the penalty box, the next group can start their passing.
- The drill continues for a set period of time, or until each group makes three trips.
Variations:
Passing distance – Mix up the distance players must pass and overlap. Start small and as players develop, make the distances between players larger.
Time challenge – Create a time limit that players must pass down the field and score before the time runs out. This challenges the players to pass and move quickly.
One-touch – Depending on the age and skill level of the players, give the players only one-touch to complete the whole drill.
Coaching Points:
- Teach the players to lead the receivers with their passes. The balls should be passed in front of the running player and into their running path so that the play can continue down the field quickly.
- Stress the importance of teamwork and communication when passing and overlapping.
- Encourage the players to take a moving touch forwards when they receive a ball. This touch allows the players to continue down the field and keep the speed of play. The touch should be just out in front of them so that they can continue running with the ball and pass the ball to the next player in stride.
- Remind the players to focus finishing their shots and putting every shot on target.
9. Pass Through Traffic
How the Drill Works:
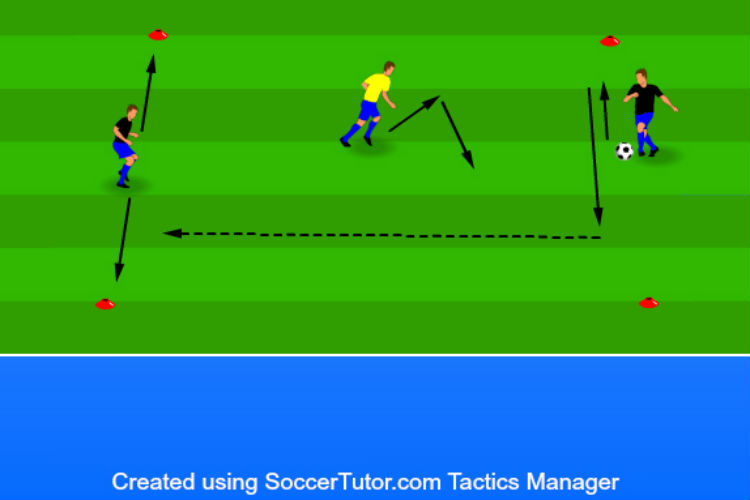
Players divide up into groups of three players per playing area. One player in each group starts in the middle of the playing area as the defender while the other two players start on the outside and try to pass the ball around the defender.
Purpose:
Develops passing, dribbling, and movement with and without the ball. Players must be creative with fakes and quick decision making in order to maintain possession of the ball.
Setup:
- Divide the team into groups of three players with each group having one soccer ball.
- Use four cones to mark a square grid about 5-6 yards wide for each group.
- In each of the groups, one player starts inside the grid as the defender, while two players start on offense and position themselves on opposite sides of the grid.
- Decide on a total time that the drill will be played for.
Instructions:
- The two offensive players in each group attempt to pass the ball through the grid while the the defender tries to intercept the ball.
- Passers are free to dribble, fake, and create space for themselves in order to complete passes to their partner who is free to move anywhere along the opposite line.
- The offensive players must stay tight to their line while the defender is not allowed to go outside of the grid.
- When the defender intercepts the ball, the offensive player responsible for losing the ball switches places with the defender and the drill continues.
- Complete as many rounds as needed in the decided time period.
Variations:
Rotation – Instead of rotating players after a loss of possession, have them rotate after a set period of time (30-60 seconds).
Touch limit – Limit the number of touches the offensive players have. Give players three or two touches, depending on the skill of the players.
Coaching Points:
- Vary the size of the grid, depending on the age and skill level of the players. A larger grid will make the game easier for passes to be connected, while a smaller grid will make it more challenging for advanced players.
- Encourage the players to be creative and decisive when beating the defender.
- Stress that the players need to constantly move and create new passing angles for their partners. The movement will open up play and help partners keep possession.
- Challenge the players to count their passes and see how many they can get.
- Remind the players to be light on their feet and ready to change directions quickly.
10. Space Wars
How the Drill Works:
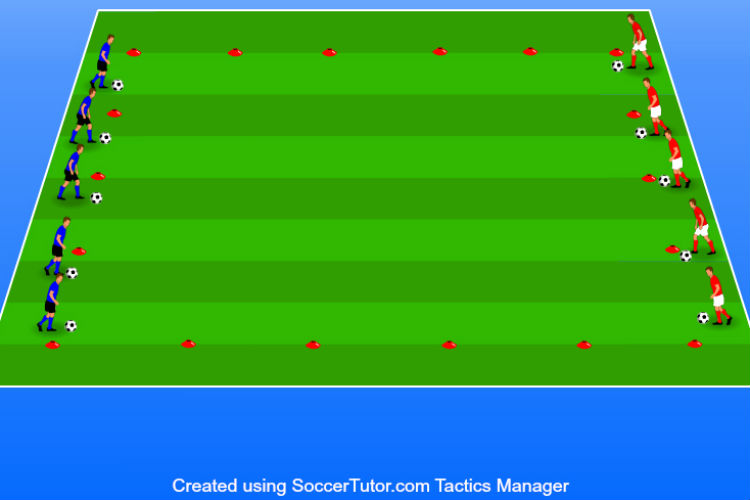
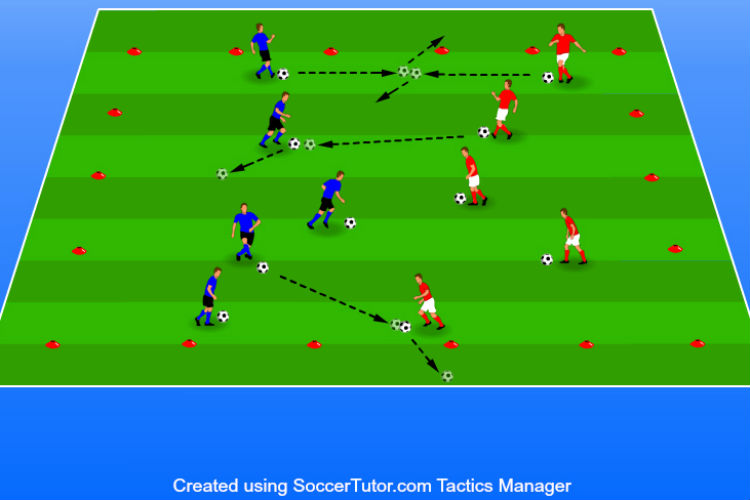
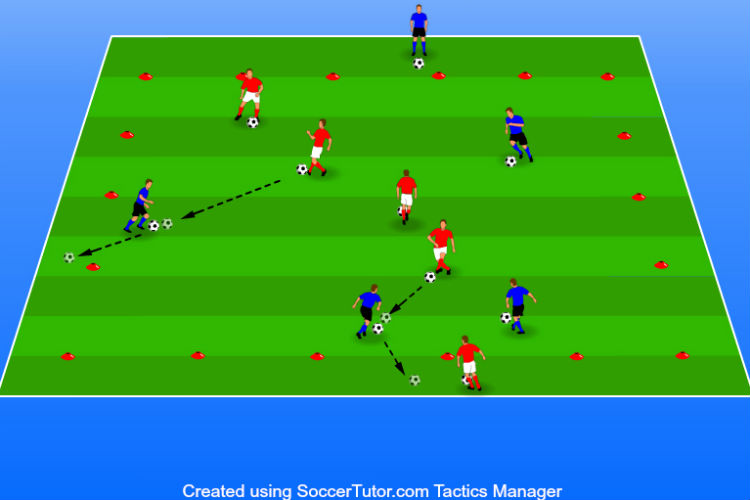
Players are divided into two teams and attempt to knock their opponent’s soccer balls outside of the playing area while protecting and dribbling their own soccer ball. When a player’s ball is knocked outside of the grid, that player is out for the remainder of the round. The round is won when one team has successfully knocked all of the other team’s balls out of the playing area.
Purpose:
Develops dribbling and ball protection in a fun, competitive, team game. Players must be able to protect their ball from their opponents while also attempting to kick their opponent’s ball out-of-bounds.
Setup:
- Use several cones to mark a square grid, 20-30 yards wide, depending on the players’ age and skill level.
- Form two even numbered teams, and assign matching colored jerseys to each team.
- Each team lines up on one side of the grid, with each player having one soccer ball.
Instructions:
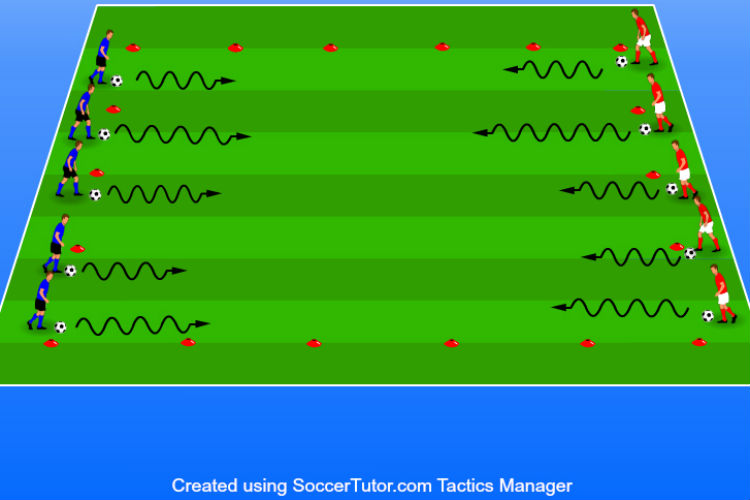
- On the coach’s command, both teams of “star fighters,” begin dribbling inside of the grid and attempt to kick the opponent’s ball outside of the grid while also protecting their own ball.
- Players attempt to pass their ball into their opponent’s ball and knock it out of play.
- If a player’s ball is knocked outside of the grid, then that player is out for the remainder of the round and must stay outside of the grid.
- If a player’s ball is knocked, but does not leave the playing area, that player is free to chase after their ball and keep playing as long as their ball stays inside the grid.
- If a player misses a pass, and their ball goes out of play, that player is out for the remainder of the round.
- Players must keep their ball close to them and constantly protect and dribble their ball. Players are not allowed to leave their ball and run around knocking other players’ ball out.
- The round is won when one team successfully knocks all the other team’s balls out-of-bounds.
- Play as many rounds as needed.
Variations:
Everyone for themselves – No teams. Everyone is on their own and the last one standing is the winner of the round.
Kick to knock players out – Instead of knocking their opponents’ soccer balls with their own ball, players attempt to kick their opponent’s soccer ball with their feet. This version is best to develop ball protection skills.
Coaching Points:
- Teach the players to keep their soccer ball close and try to maintain control of the dribble.
- Instruct the players to maintain good vision of the field and the opponents.
- Remind the players to pay attention to both accuracy and power of the passes so that their ball stays inside the grid.
- To make the drill more fun for the kids, have them go outside and “crash” by laying down on the ground when eliminated.
11. Switching Play
How the Drill Works:
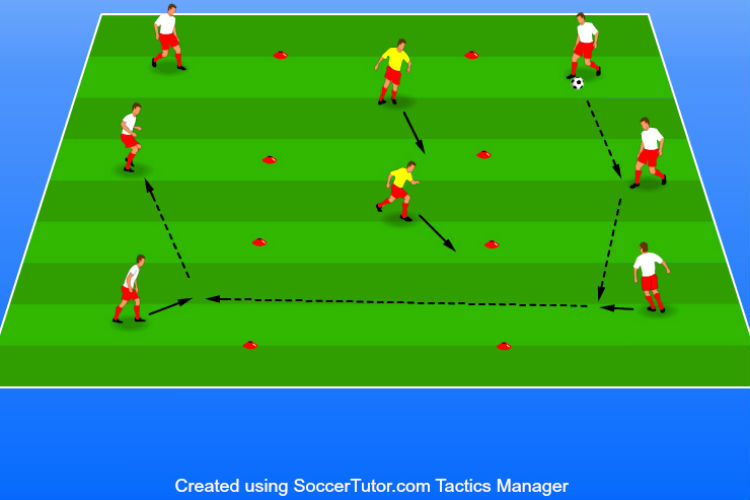
Three offensive players on each side of the playing grid attempt to pass the ball through the middle of the playing area while two defenders move to prevent the ball from passing through.
Purpose:
Develops ball movement and speed of play. Players are forced to move the ball quickly and find the right moment to pass the ball through the middle of the grid. Passing accuracy and awareness are tested.
Setup:
- Set up two parallel cone lines about 15 yards long and 7-8 yards apart.
- At least 8 players are needed for this drill. Two players start as defenders in between the two cone lines while the other 6 players divide into two groups of 3 players and position themselves on the outside of each cone line.
- One offensive group is assigned one soccer ball.
Instructions:
- On the coach’s command, the offensive group with the ball starts moving and passing the ball attempting to pass the ball through the middle zone.
- The two defenders move and try to intercept the passes that the offense try to pass through the middle zone.
- If the defenders intercept the ball, the ball is given back to the offensive group and play continues.
- The offensive groups must stay behind their respective cone lines when passing. The defenders must stay in the middle zone while defending.
- For each successful pass through the middle zone, the offense is awarded one point.
- After a determined period of time (1-3 minutes) the players rotate positions and the game is repeated.
Variations:
Different number of players – Instead of playing 6-on-2, set up a 8-on-3 game with one player less on defense than in each of the offensive areas, or make it more difficult and have an even number of players in each area (6-on-3, 8-on-4, etc.).
Competition –The defensive group that successfully allows the least amount of passes through the middle is the winner.
One-touch – Players only have one-touch to pass between themselves and through the middle zone.
Coaching Points:
- Vary the playing area size. Smaller areas increase the difficulty for the offense to pass the ball successfully through the middle zone.
- Encourage players to make low, sharp passes, on the ground, and to move the ball quickly. This will lead to better opportunities to play the ball through the middle zone.
- Teach the players to be patient when trying to find a window to play through.
- Insist on the players constantly moving and providing passing options.
- Stress that players keep their heads up and maintain good vision, in order to be aware of windows in the defense that they can play through.
- Demand that the players waiting for the ball on the other side of the area are moving and creating good passing angles for the group with the ball.
12. Triangle Goal Game
How the Drill Works:
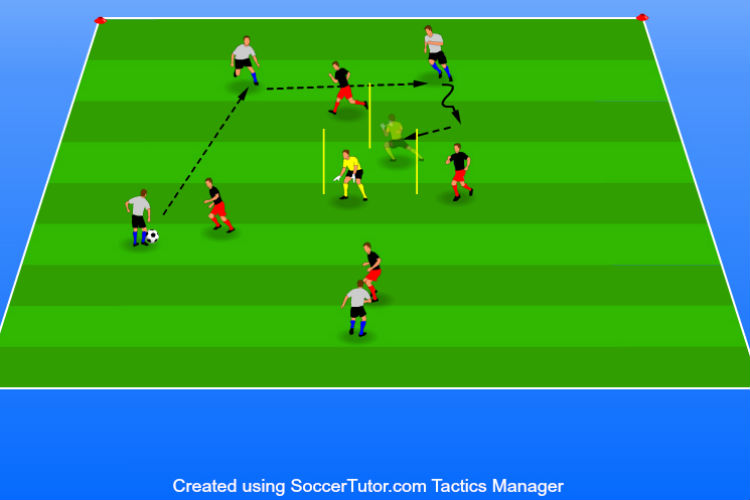
Two teams compete to keep possession and score by passing the ball through any side of the triangle set up in the middle of the playing area. Teams must complete at least two passes before attempting to pass the ball through the triangle. A goalkeeper is placed inside the triangle and attempts to prevent any team from scoring on any side of the triangle.
Purpose:
Develops ball and player movement while maintaining possession. Players must be spatially aware and react quickly on offense and defense. The activity works to help players move the ball quickly and find the right time to play a penetrating pass.
Setup:
- Use several cones to mark a square-shaped playing grid, about 30x30 yards.
- Place three flags, or tall cones, in the shape of a triangle in the center of the playing area. The triangle sides should be about 5 yards long.
- Set up two teams of four players and assign each team a different jersey color.
- One team starts on offense with the ball while the other team starts on defense.
- One goalkeeper starts inside the triangle.
- Decide on a period of time for each round.
Instructions:
- The offensive team attempts to score, after completing two passes, by passing, or shooting, the ball through any side of the triangle defended by the goalkeeper.
- The defensive team attempts to intercept the ball and complete two passes before attempting to score on the triangle.
- The goalkeeper is free to move inside the triangle, or just outside of it, and attempts to prevent either team from scoring through any of the three sides.
- When a goal is scored, the ball is immediately live on the other side of the goal. The team in possession of the ball must then complete two passes before attempting to score.
- When the goalkeeper makes a save, they throw the ball into and open space, inside the playing area. Teams must then compete to win and take possession of the ball.
- One point is given to a team each time they score on the goalkeeper. The ball must beat the goalkeeper below the height of the flags to count.
- Teams keep score, and after a set period of time the team with the most points wins.
Variations:
Different number of players – Play 3-on-3, or 5-on-5 game, etc. Adjust the playing area accordingly.
Different number of passes – Have the players complete three or more passes before attempting to score a goal.
Limit touches – Limit the number of touches players have. Give players less touches to increase the difficulty.
Add a neutral player – Add a neutral player to create a numbers advantage for the offensive team. This is helpful if teams are having a hard time connecting passes and scoring.
Coaching Points:
- Vary the size of the playing grid, depending on the players’ age and skill level.
- Instruct the players to switch play and move the ball quickly to catch the defense and goalkeeper off-guard, making it easier to score.
- Encourage players to keep their eyes up and see the field to find the open space.
- Teach the players not to force play. If a shot is not on after two passes, teach the players to keep the ball until a good opportunity comes.
- Challenge the players to use their bodies to protect the ball and keep possession for their team.
- Remind the goalkeeper to constantly move and stay involved in the game.
13. Two Teams One Touch Passing
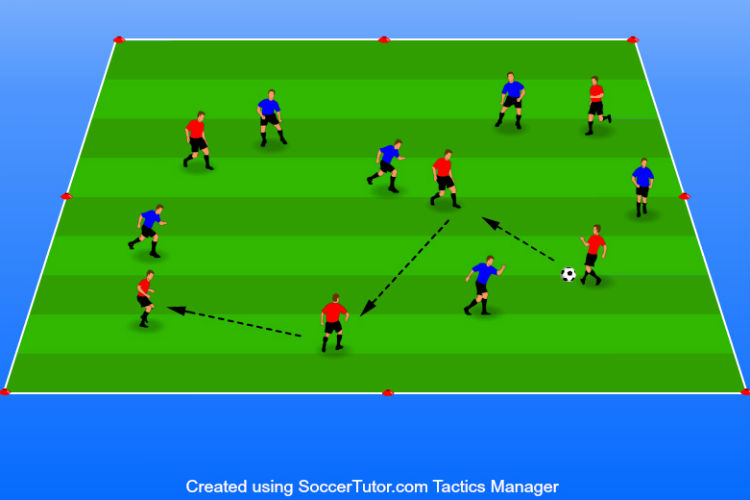
How the Drill Works:
Two teams compete against each other trying to complete as many one-touch passes as possible. As soon as the team without the ball takes the ball from the other team, they then attempt to complete one-touch passes. Players are free to take more than one-touch, but the score will only reflect passes completed in one-touch. The game continues this way for a set period of time or score.
Purpose:
Quick paced possession game that takes a higher skill level to execute. Players must be able to play quickly and move off the ball to support their teammates. The drill focuses on quick decision making and speed of play, as well as player movement for support.
Setup:
- Set up cones to create a square shaped playing area. Depending on the number of players, skill level, and age make the space larger or smaller.
- Divide the group into two teams with matching color jerseys for each team.
- One team starts on offense with a soccer ball, while the other team begins on defense.
- Decide on a time limit or score for each round.
Instructions:
- On the coach’s command, the team in possession starts moving and exchanging one-touch passes among each other.
- The team without the ball tries to win the ball in order to complete their own one-touch passes. The team that lost the ball then would become the team trying to win the ball back as quickly as possible.
- If, and when, the ball leaves the playing area, the team that last touched the ball goes to defense when the new ball is started.
- Teams are awarded one point for each of their completed one-touch passes. The team with the most passes at the end of each round wins. Players can take more than one-touch, but will not be scored for that pass then. Only count one-touch passes.
- Complete as many rounds as needed.
Variations:
Different number of players – The game can be played with any number of players. For example, 10v10, 5v5, etc.
Add neutral players – Add neutral players, players that are on whichever team has the ball. Adding neutral players should help teams complete more passes. This is a good option to make the game easier and flow better.
Two-touch – if one-touch passing is too difficult, give players more touches to help the game along. Count the number of passes that are made with two-touches.
Only 1-Touch – Players only have one touch. This is great for higher skill level players. Players cannot dribble. Only one-touch passing.
Coaching Points:
- Pay attention to spacing and vary the size of the playing area, depending on the size of the group, players’ age and skill level.
- Stress that players must be moving constantly to get open for their teammates. Proper angles and timing are important for the players to keep possession of the ball.
- Encourage players to play quickly and keep their eyes moving so that they are aware of the field and players.
- Instruct the players to face the field and their teammates, so they could maintain good vision, make better decisions and pass with one touch only.
- Encourage the players to communicate for the entire time.
- Remember to count only one-touch passes, but players can use more touches to pass if that is what the situation calls for. Players are invited to use more touches, but remind them they will not be rewarded points for them.
14. Pass and Move Through Traffic
How the Drill Works:
Players separate into four lines in a square grid (or tilted square). Two of the players have a ball at their feet. The players opposite from one another pass the ball back and forth. After each pass, the player rotates to the right. Since the players will be passing through the same zone, they must keep their heads up and be aware of what’s happening to avoid hitting the other pair’s ball.
Purpose:
This drill seems straightforward but it requires focus, awareness, timing, and technique. The main purpose is to improve players’ awareness without a reduction in the quality of their passes and first touches.
Setup:
- Cones are placed 10 yards apart to form a square or tilted square grid.
- Players line up behind each cone in even numbers (if possible).
- Two balls are required - one ball is shared between two groups. Groups opposite one another work together.
- Determine a time for each round (3 to 5 minutes is recommended).

Instructions:
- On the coach’s whistle, the drill starts.
- Players with the ball must pass to the person opposite them. Since both passing lanes intersect, players have to keep their heads up and time their passes correctly.
- The receiver takes a touch, then looks up, watches the other group, and times their pass.
- After playing the pass, players move to the end of the line on their right. The next person in line steps forward to receive the next pass.
- The drill continues for the allocated time.
Variations:
Touch limit - Start out without a touch limit but gradually introduce limits to 3, 2, and eventually, 1 touch as players improve.
Weak foot - All touches must be with the player’s weaker foot.
Consecutive pass targets - Set targets for consecutive successful passes.
Coaching points:
- Emphasise accuracy first, ensuring the pass gets to its destination.
- All passes should be played on the ground (no chips or lofted passes).
- Encourage players to keep their heads up and be aware of their surroundings.
- Ensure players are using the correct passing technique with the inside of their foot.
- Look out for crisp and consistent passing.
- As players improve, increase the tempo or consider trying out one of the variations.
15. 1-2 Pass-Move-Shoot
How the Drill Works:
Players work together in passing triangles to create a goalscoring opportunity. The key to this drill is quick passing and movement. Players must be accurate. One mistake, bad touch, or misplaced pass will disrupt the flow of the exercise, killing the momentum. This is a great drill for midfielders and attackers but is relevant for all positions.
Purpose:
The primary objective of this drill is to get players accustomed to passing and moving in order to progress the ball. The idea is to advance the ball and create a goalscoring opportunity, which is a sequence that relates directly to a real game.
Setup:
- Set up goalposts, then create a 4-cone, square grid off the center to either side. The cones should be 10 to 15 yards apart.
- Ideally, the cone grid will be positioned at the edge of the penalty area (or 18 yards from the goal).
- Players line up behind each cone in even numbers (if possible).
- One ball is needed and it starts with the group closest to the goal.
- Determine a time for each round (10 minutes is recommended).

Instructions:
- The drill starts when the first player passes the ball laterally to the second player.
- As soon as player one makes the pass, they run diagonally across the grid toward player three, looking for a return pass (from player two).
- Player two times the run and hits player one while on the move.
- Player one controls the ball and then plays a quick pass to player three, before joining the line behind player three.
- Player three controls the ball and then plays a lateral pass to player four.
- As soon as the pass is played, player three sprints diagonally across the grid toward the goal, looking for the return pass.
- Player four plays a through ball into player three’s path to the goal.
- Player three takes a touch, dribbles toward the goal, and takes a shot.
- Then, the drill repeats with the next players in line.
Variations:
Opposite side - Repeat the drill but from the opposite side, forcing players to pass at different angles and use both feet.
Touch limit - Once players get to grips with the drill, limit the touches to 3, 2, and then eventually, 1.
Coaching points:
- The priority is smooth, accurate, and slick passing and movement so look out for these points.
- The initial focus should be on accuracy and precision - speed comes later.
- Encourage players to communicate throughout the drill, calling for passes, yelling “time”, and other relevant details.
- Once players get it right, gradually increase the tempo.
Looking for More Soccer Drills?
It's important that we start using great soccer passing drills early to allow players learn how to work together, read the game, pass with correct technique, and utilize space on the field.
Ensure you're incorporating these drills above into every practice you run!
If you'd like to see even more, check out our full post that includes 123 soccer drills.

