8 Soccer Finishing Drills (2024 Update)
Here's a soccer truth everyone can agree with:
Scoring goals in soccer is incredible hard!
That's why coaches need to use effective soccer finishing drills every practice session to ensure ALL players have the skills to finish around the goal.
Keep in mind that learning how to score goals doesn't simply involve learning correct shooting technique... (although that is important!)
Players must be learning and practicing how to read the play and constantly working on their decision making.
These are drills you should be using every training session if you want to improve your team and give each individual player an opportunity for success at the next level.
Check out the following 7 soccer finishing drills I highly recommend:
8 Soccer Finishing Drills
1. 2-on-2 Plus Two
How the Drill Works:
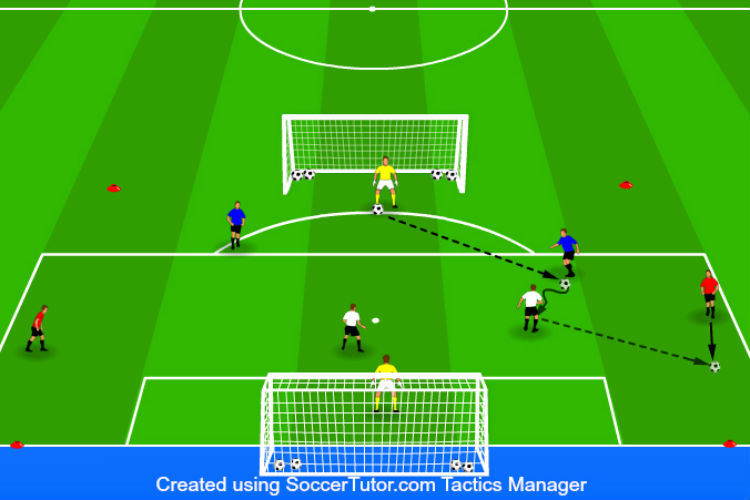
Two teams of two players with the help of two neutral players compete to score the most goals in the round. One neutral player on each sideline is free to move up and down the line while passing and crossing to the team in possession.
Purpose:
Competitive 2-on-2 game inside a small playing area that develops crossing, finishing, defending and movement skills. Players are constantly getting repetitions while shooting and defending.
Setup:
- Use four cones to mark a rectangle 25 yards long by 30 yards wide. The field is wider than long due to the focus on crossing and finishing.
- Place one full-size goal on each end line. The goals should be placed 25 yards away from each other.
- Position one goalkeeper in each goal. If there are extra goalkeepers rotate them in after every round.
- Divide the players into teams of two and assign each team a different colored jersey. If there are more then five teams, create two fields to give the players more repetitions.
- Have two teams start in the center of the field. Assign each team to defend a different goal.
- Have one other team be the starting neutral players. Position one player on each sideline. Tell the neutral players they are free to move up and down the sideline as well as 3-4 yards outside the line.
- Divide all the soccer balls between the two goals.
- One goalkeeper starts with a ball.
- Decide on the number of rounds and time limit for each round. Each team should play at least four times for 45-90 seconds per round.
Instructions:
- On the coach’s signal, the goalkeeper passes the ball to their teammates and the players compete in a 2-on-2 game.
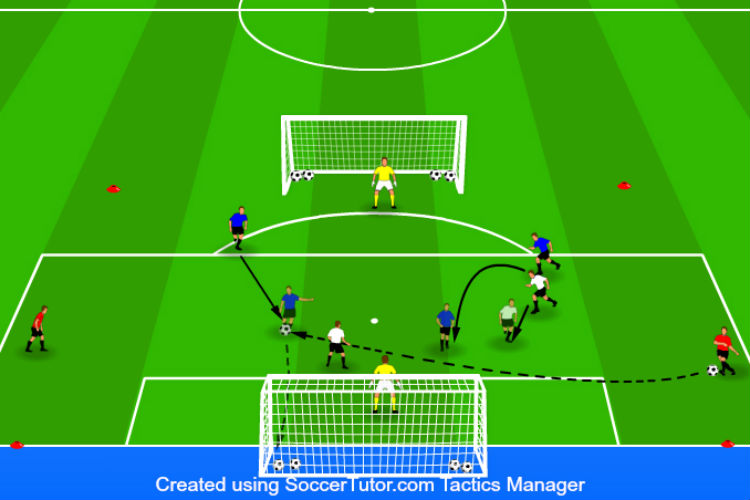
- Players are free to score through the run of play or off a cross from the neutral players.
- Neutral players move along the sidelines and pass, or cross, the ball to the team that passed them the ball. Neutral players can dribble along the sideline to deliver a cross if needed.
- The team defending attempts to win the ball back as quickly as possible and score on the other team.
- The defending team can not defend the neutral players.
- Goalkeepers can pass to the neutral players directly and be apart of their team’s possession.
- When a goal is scored, the goalkeeper from the scoring team starts a new ball from their goal.
- If the ball goes out-of-bounds, the team that did not touch the ball last starts with a new ball from their goalkeeper.
- The team with the most goals scored at the end of the round wins.
- Teams rotate after each round. The neutral players come onto the field while one team becomes the neutral players.
- Each team should complete at least four rounds on the field. Each round should be 45-90 seconds long.
Variations:
Crossing – Teams can only score off crosses, or passes from neutral players.
Touch limit – Give the field players, or neutral players a touch limit to increase the tempo of the game and make the players think faster. Give the players three, two, or one touch depending on skill level. Field players and neutral players can be given different touch restrictions depending on the focus.
Winning team stays – The winning team after each round stays on the field while the team that lost becomes the neutral players.
Point system – Award one point for a goal off a shot from one of the field players. Two points for a goal off a cross using the feet. Three points for a goal off a cross using the head.
Numbers – Make it 3v3, 4v4, etc. Increase the size of the field as more players are added.
Coaching Points:
- Teach the players to constantly move on both the offensive and defensive side of the ball! This game is demanding and requires a lot of touches and movements from the players.
- Educate the players to keep their head and eyes moving to read the game. Seeing the field and where players are will allow players to make better decisions and give themselves a better chance of winning.
- Remind the players to be conclusive with their decisions. Players should make quick, quality decisions with and without the ball.
- Teach the players to attack the crosses, both defensively and offensively, and try to be the first one to the ball.
- Challenge the players to be explosive and creative on the ball when dribbling. Players should take the opportunity to shoot when the opportunity is available.
- Motivate the goalkeepers to communicate with their team and to be quick between the posts!
2. Agility Finishing
How the Drill Works:
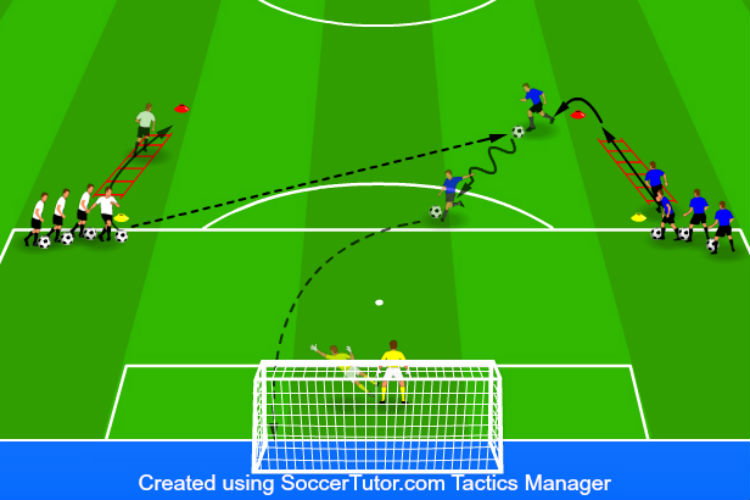
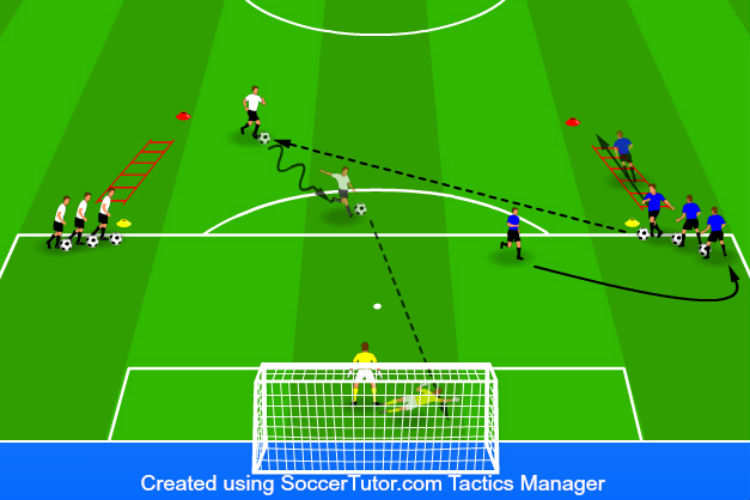
Players complete an agility ladder, or series of cones before receiving a pass from the opposite line and shooting on goal.
Purpose:
Develops players’ footwork and ability to control a ball while on the move. Players increase agility and finishing skills in this quick shooting exercise.
Setup:
- Place one full-sized on the end line.
- Position one goalkeeper in goal. If there are extra goalkeepers have them rotate in every 3-4 repetitions.
- Place two cones just outside the penalty area. The cones should be 20-30 yards away from each other. These are the starting cones.
- Place a short agility ladder behind each cone at a 45-degree angle. If ladders are not available, use cones for the players to run over, or slalom through.
- Place one cone 3-4 yards away from the end of each agility ladder.
- Have the players divide evenly behind the starting cones.
- Each player in line should start with a ball at their feet except for the first player in one of the two lines.
- Decide on the number of rounds and the time limit for each round. At least 3 rounds of 5 minutes is suggested.
Instructions:
- The first player without a ball, in one of the two lines, starts the activity by running through the ladder with two feet in each box before running around the cone at the end of the ladder.
- The first player in the opposite line passes their ball to the player running as soon as that player rounds the top cone. The passer then begins to run through their ladder in the same manner as the opposite player did.
- The player receiving the pass takes one touch and then attempts to score on goal.
- The player from the opposite line, who first passed the ball, now receives a pass from the other line and the process continues in this alternating pattern.
- Players retrieve their ball after their shot and then return to the back of their line.
- At the end of each round, collect any extra soccer balls, and then have the lines switch sides.
- Complete at least 3 rounds of 5 minutes.
Variations:
Different agility – Give players different footwork patterns they must complete through the ladders. If ladders are not available, use cones or sticks for players to work through. Be creative. Challenge the players and their footwork.
1-touch – Have the passers take a little power off their pass so that the players finishing can run onto the ball and strike it one-time.
Dribble the keeper – Allow players to dribble around the goalkeeper to work on another way to finish. This also allows goalkeepers to develop their 1-on-1 saving skills.
Competition – Count the number of goals each line scores for the round. The team with the most goals at the end of the round is the winning line.
Distance – Move the cones further away from goal to increase the distance to goal.
Be creative – Change the activity as needed. Change the shot angle or agility players complete before shooting.
Coaching Points:
- Show the players what footwork pattern they need to complete through the ladder. Have the players start slow and make sure they get the footwork right before increasing the tempo.
- Remind the players of the importance of their first touch. Their first touch should be just far enough out in front of them that they can take 2-3 steps before striking through the ball smoothly.
- Teach the players to lock their ankle on each shot! Players can use their laces or inside of their feet to finish, but need to lock their ankle on both techniques.
- Stress that players make clean, firm passes to each other.
- Remind the players to take a quick look up to see the goal and goalkeeper before finishing.
- Challenge the players to complete the activity at game speed once they get the footwork right. The lines should be alternating shots one after another!
- Motivate the goalkeepers to block each shot and return to their feet quickly for the next save. This is a fantastic activity for goalkeepers to get plenty of shot stopping repetitions!
3. Back to Goal
How the Drill Works:
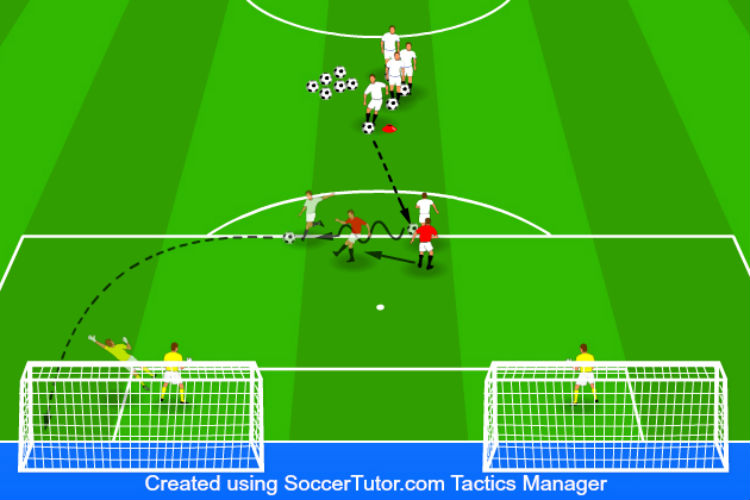
One attacker, with their back to goal, receives a pass and attempts to beat the defender on their back and score on one of the two goals.
Purpose:
Develops players’ abilities to turn and score with a defender on their back. Players improve their body positioning and strength as they protect and turn with the ball. Players also increase their defending and shot blocking skills.
Setup:
- Place two full-size on the end line. The goals should be 8-12 yards apart from each other.
- Position one goalkeeper in each goal. If there are extra goalkeepers, have them rotate in every 3-5 repetitions.
- Place one cone 25-30 yards away from the goal.
- Have all the players form a line behind the cone.
- All the balls are placed with the players in line.
- Have two players step out of the line and position themselves on the edge of the penalty box. Assign one as the defender and one as the attacker. The defender starts between the goals and the attacker.
- The first player in line starts with a ball at their feet.
- Decide on the number of rounds and the time limit for each round. Two rounds of 8-12 minutes is suggested.
Instructions:
- The first player in line passes their ball to the attacker. The attacker is free to move side-to-side and check towards the passer to create space from the defender before receiving the pass.
- The attacker receives the pass and attempts to turn with the defender on their back.
- The attacker tries to beat the defender and score on either of the two goals.
- The defender attempts to win the ball, or block the attacker’s shot.
- The turn is over when a goal is scored, the defender wins the ball, or the ball goes out of bounds for any reason.
- The attacker retrieves their ball and returns to the back of the line.
- The defender becomes the new attacker and the passer becomes the new defender.
- The next turn can start as soon as the players are ready.
- Continue this process for the remainder of the round. Give the players a quick rest halfway through. Retrieve any extra balls and give coaching points as needed.
- Repeat for as many rounds as needed.
Variations:
Touch Limit – Give the players only five, four, or three touches to score.
Distance and angle – Change the distance and angel to the goal the attackers start from.
Add players to offense or defense – Give an advantage to the offensive or defensive side of the activity depending on the focus. Have two attackers against one defender, or have equal numbers and go 2v2 or 3v3.
Competition – Works best with a smaller group of players so they get more repetitions. Have the players count how many goals they score. Most goals at the end of the round is declared the winner.
Coaching Points:
- Educate the attackers on their movement before the pass to create space between them and the defender. It may not be possible every time, but players should try to create 1-2 yards of space so that they have a better first touch and possibly turn and face the defender on their first touch. Attackers should explode away from their defender, towards the passer, to create that extra little space.
- Remind the players how important their first touch is. Players should use their first touch to protect the ball and turn around the defender if possible.
- Most important! Attackers need to check their shoulder, and feel for the defender to know what the game calls for. Attackers need to see where the defender is at and take their touches accordingly.
- Teach the players to protect the ball and to use their bodies to be strong when the defender steps in to win the ball. Players need to be comfortable with defenders on their back and not panic.
- Challenge the players to be creative, elusive, and explosive to beat their defender!
- Motivate the defenders to improve their defending footwork and timing to prevent attackers from scoring on them.
4. First to the Ball
How the Drill Works:
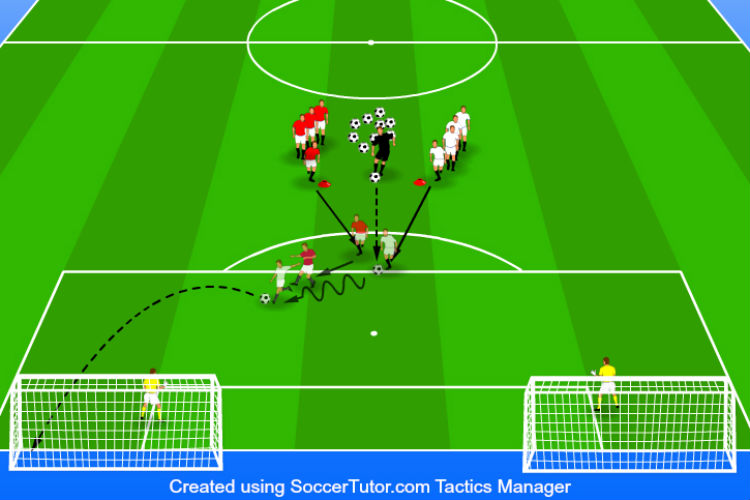
With a ball passed forward into space, two players attempt to be the first to the ball and score on one of the two goals in front of them.
Purpose:
Competitive 1-on-1 activity focusing on developing players’ ball control, dribbling, and finishing. Players also improve their speed, reaction time, and defending.
Setup:
- Set up two full-sized goals on the end line with 15-20 yards of space between them.
- Place one goalkeeper in each goal. Have extra goalkeepers rotate in every 2-3 repetitions. If goalkeepers are not available, complete the activity without them. The activity can also be completed using mini goals, or cone gates if needed.
- Place two cones about 30 yards from the goals. The cones should be placed in the center of the field with 5 yards of space between them.
- Have the players form a line behind each cone.
- All the balls start with the coach in between the two cones.
- Decide on the number of turns each player will get, or the total time limit for the activity. Each player should get 12-16 turns, or play for 15-20 minutes.
Instructions:
- The first player in each line prepares to run forward on the coach’s pass.
- The coach passes a ball straight forward, about 8-12 yards in front of the two cones.
- The two players immediately react to the coach’s pass as soon as the ball is kicked and attempt to be the first player to the ball.
- The first player to the ball becomes the attacker and attempts to dribble and score on either of the two goals.
- The player without the ball attempts to prevent the attacker from scoring by blocking, or winning the ball.
- The turn is over after the ball is shot, or the defender prevents the attacker from shooting.
- The coach starts a new turn for the next player in each line once the players in front of them complete their turn.
- The shooter retrieves their shot and then returns to the back of one of the lines.
- Players are encouraged to switch lines and opponents after each turn.
- Continue this process until there are no more soccer balls available, or 4-6 minutes has passed. Give the players a quick rest as they collect any lost soccer balls before starting the next round.
Variations:
Cone gates – Instead of using goalkeepers and goals, have the players dribble through two cone gates set up where the goals would be. The players must dribble, under control, through one of the two gates to score. Focuses more on dribbling and ball control.
One goal – Use one goal to make it more difficult to score. Goalkeepers repetitions increase. Defending is easier using one goal.
Number of players – Play 2-on-2, 3-on-3, etc.
Ball toss – Coach tosses the ball in the air for players to get to. Makes it more difficult for the players to get the ball under control before shooting.
Coaching Points:
- Increase, or decrease, the space between the goal and the starting cones depending on the age and skill level of the players.
- Instruct the players to react quickly off the start and attempt to get positioning in front of the other player. Getting in front of the player will create a better scoring opportunity.
- Teach the players to get a good first touch forward when they get to the ball. This first touch is important to keep the player running at full speed and the ability to stay in front of the other player.
- Remind the players to finish quickly. Keep the activity game-like and encourage the players to score as soon as they to build good habits.
- Educate the players to use their bodies to shield and protect the ball from the defender.
- Challenge the players to be quick and decisive when beating the defender. If the defender can get in front of the attacker, the attacker should use quick fakes and decisions to create space for a shot.
- Motivate the defenders to make it difficult on the attackers to score. If a player can not get to the ball first, make sure they prevent the attacker from scoring then!
- Teach the defenders to move their feet, bend the knees, and remain on balance when defending the attacker. Defenders should not reach for the ball, but rather time their tackle to ensure they win the ball.
5. Hat-Trick
How the Drill Works:
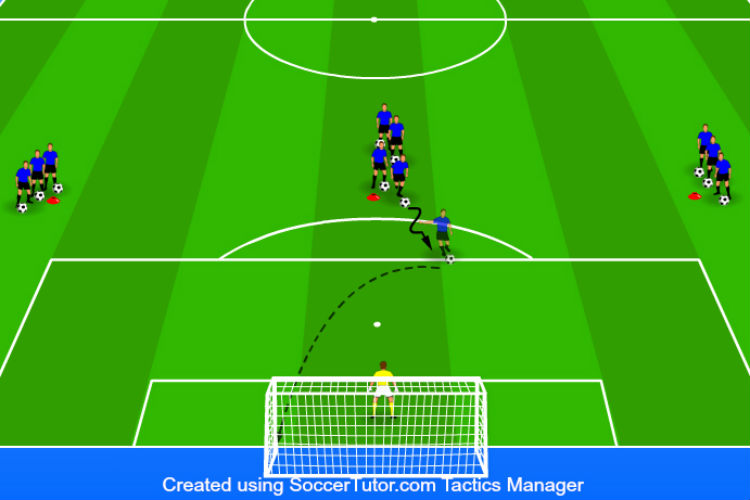
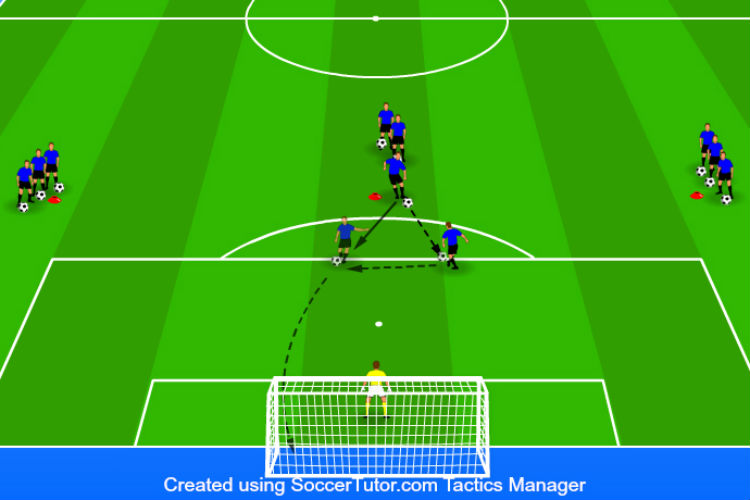
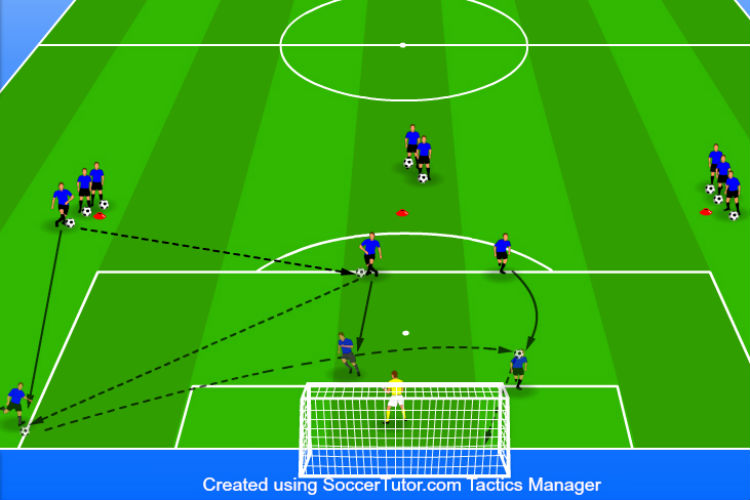
Three different shots are taken on goal each turn. The first shot is one from distance. The second is a lay off outside the penalty box, and the third is a shot off a cross. If all three goals are scored, a “Hat Trick” has been completed!
Purpose:
Develops players’ finishing abilities from three different scoring scenarios. Players increase the ability to score from distance, a one-time lay off, and a cross. Players get many repetitions to improve their confidence in front of goal.
Setup:
- One full-size goal is needed on the end line.
- Position one goalkeeper in the goal. If there are extra goalkeepers, have them rotate in every 3-6 repetitions.
- Place three cones five yards outside the penalty area. One cone should be in the center of the field with the other two cones placed towards the sides of the field.
- Have the players divide themselves evenly behind the three cones.
- Divide the soccer balls among the three lines. More soccer balls are needed in the center line if possible.
- The first and second player in each line should start with a ball at their feet.
- Decide on the time limit for this activity. 10-15 minutes is suggested.
Instructions:
- The first player, in the center line, starts their turn by dribbling towards the goal and then shooting on goal, attempting to score. The player should complete their shot around the top of the penalty box line.
- The shooter then turns around and prepares for a pass from the player behind them in line.
- The second player, in the center line, then passes to the player who just took a shot.
- The player receiving the pass lays the ball off for the passer to run onto and shoot on goal.
- After the second player has taken their shot, the first player in one of the wide lines passes their ball to the player who just shot the ball.
- The player receiving the pass then passes the ball back to the wide player who is running towards the end line. The wide player should receive the pass where the penalty box line meets the end line.
- The wide player then crosses the ball into the box for one of the first two shooters to finish.
- The first three players’ turn is over after the cross, and the next three players begin their turn. The players who just finished their turn are free to return to the back of any of the three lines. Switching lines is encouraged and players should balance out the lines as needed.
- The next turn will complete the same pattern, but receive a cross from the alternate side.
- A “Hat Trick” is achieved when all three goals during a turn are scored. Players should shout “HAT TRICK” each time they achieve this.
- The process continues this way for the remainder of the round. Players alternate crosses from both sides of the field and switch lines as needed between turns.
- Give the players a quick rest if needed. Retrieve any lost balls as the activity runs, or pause briefly to collect them all before continuing. Complete for 10-15 minutes.
Variations:
Distance – Increase the distance players start from goal to increase the shot and cross distance.
Competition – Count the number of goals versus the number of missed, or saved shots. The goalkeepers are declared winners if the players miss more goals than they made.
Coaching Points:
- Teach the players to lock their ankle when completing any of the three shots in the activity. Players should strike through the ball smoothly and focus on each of their shots.
- Educate the players on the runs they need to make before the cross comes into the box. One player should go near post while the other player runs to the back post.
- Remind the shooters, and crossers, to take a quick look up to see the goalkeeper, or other players.
- Challenge the players to be consistent with their goal scoring and score as often as possible. Players should focus on each repetition and score as many goals as they can!
- Motivate the goalkeepers to get back up quickly after each shot and prepare for the next one! This is a great activity for goalkeepers to get a lot of different looking shots and repetitions.
6. Two Goal, Two Touch
How the Drill Works:
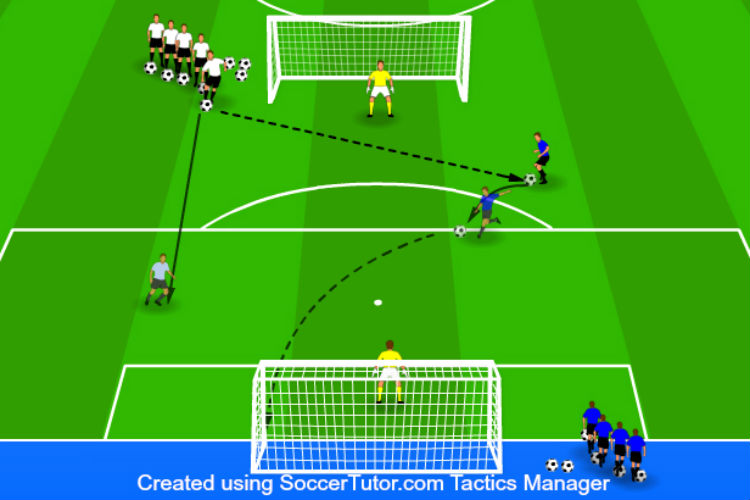
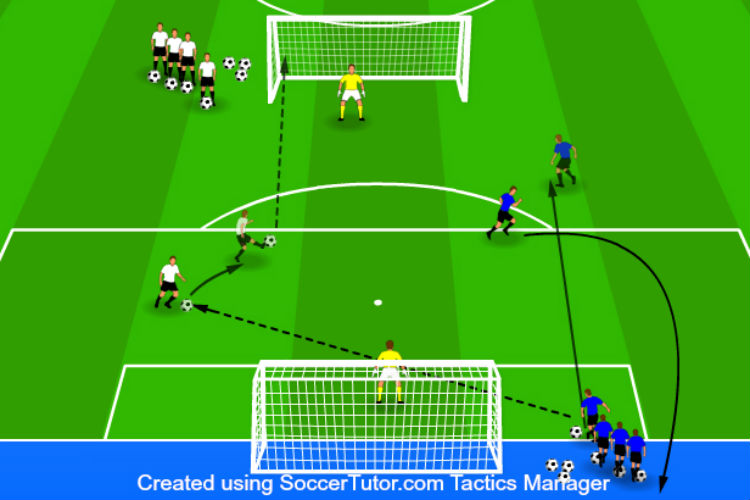
With two goals positioned 25 yards away from each other, players form one line to the side of each goal. The players from one line pass, diagonally across to a player who has checked towards the ball. The player receiving the ball turns and shoots within two touches before the player who passed the ball checks towards the other line to start their turn.
Purpose:
Develops players’ ability to turn and shoot using two touches. Players get a lot of quick repetitions on goal to develop their first touch and finishing skills.
Setup:
- Two full-sized goals are needed for this activity. The two goals should be placed 25-30 yards away from each other.
- Position one goalkeeper in each goal. If there are extra goalkeepers, have them rotate in every 4-6 repetitions.
- Have the players form a line to the side of each goal. The lines should be diagonal from each other.
- Divide the soccer balls evenly among the two lines.
- The first player in one line starts with a ball at their feet. The first player in the other line starts 18--20 yards in front of their line without a soccer ball.
- Decide on the time limit for each round and the number of rounds. At least 4 rounds of 4-5 minutes is suggested.
Instructions:
- The first player in line with a ball at their feet completes a pass to the player from the opposite line that is diagonally 10-12 yards away from the passer. The passer then runs 18-20 yards away from their starting line.
- The receiving player takes a first-touch that positions them to score on the opposite goal the ball is being passed from.
- After taking their first touch, the player then attempts to score on the goal they are now facing.
- The initial passer is now in position to receive a pass from the opposite line to repeat the process.
- Shooters retrieve their ball if they missed the goal before returning to the back of their original line.
- Passers should start their run away from their line as soon as they complete the pass to the opposite player. The activity should move quickly allowing for continuous, alternating repetitions.
- Continue the process for the remainder of the round. Retrieve any lost soccer balls and rest between rounds. Have the lines switch to the other side of goal after two rounds to work on both shooting angles.
- Complete 4 rounds of 4-5 minutes.
Variations:
Distance – Increase the distance between the goals and make the players run further away from their line to focus on shooting further away from goal.
More touches – Give the players more touches if they are struggling to get quality shots off within two touches.
Pass difficulty – Have the players chip, or loft balls into the shooters to give them more of a challenge on their first touch.
Coaching Points:
- Educate the players on the importance of their first touch. Their first touch needs to be just out from under their feet for them to run onto and strike. The touch should also position the shooter’s body towards the goal since the player is receiving a pass with their back to goal.
- Challenge the players to make the finishing as game-like as possible. Players should turn and get their shot off quickly to build good habits.
- Teach the players to lock their ankle and strike though the ball smoothly as they shoot. Players are also free to use the insides of their feet to curl the ball around the goalkeeper. Players should lock their ankle regardless of the technique they are using.
- Encourage the players to be consistent and score as often as possible.
- Motivate the goalkeepers to block each shot and to get back to their feet quickly. This is a great activity for goalkeepers to get a lot of repetitions!
7. Build-Up and Finish
How the Drill Works:
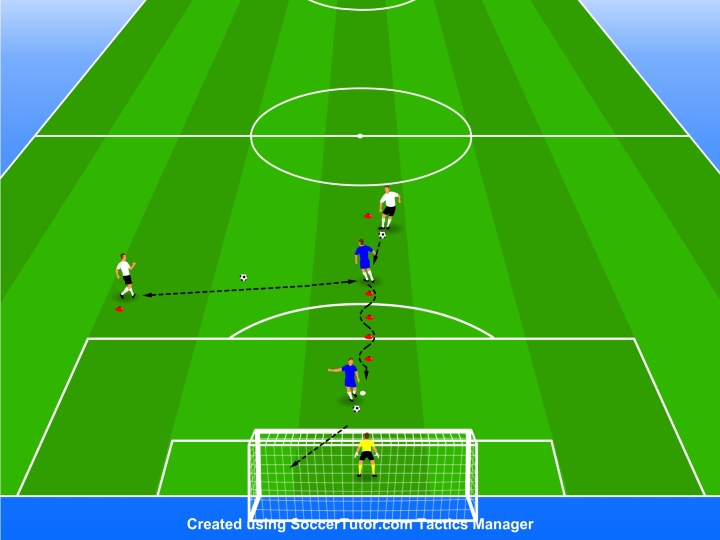
This drill is designed for midfielders, center forwards, and strikers who come deep to get the ball. The shooter makes link-up passes with two players, as they would in a real game, then dribbles through a cone weave before finishing.
Purpose:
The main idea of this drill is to practice quick and crisp build-up play on the edge of the penalty area, making players more effective in advanced positions. To boot, the dribble-to-finish sequence improves their ability to finish in busy areas of the field.
Setup:
Use the penalty box and surrounding space for this drill.
Place one approximately 10 yards from the edge of the penalty area.
Place another cone on the right-hand side of the penalty box.
Create a dribbling weave just inside the penalty box.
Set up a full-size goal (use a goalkeeper if you have one).
The shooter stands on the rim of the penalty box D.
The other players divide into lines behind the other cones.
The player at the top of the center line starts with the ball.
Instructions:
On the referee’s signal, the passer plays a ball to the shooter.
The shooter receives the ball on the turn, opening their body toward the winger.
The shooter plays a one-two pass with the winger.
After receiving the return ball, the shooter dribbles through the cone weave toward the goal.
Once through the weave, the shooter completes a 1v1 with the goalkeeper.
Once the round is over, all participants join the end of a different line.
Variations:
Opposite side - Complete the same drill but from the opposite side, focusing on passes and touches with the other foot.
Weak foot shooting - Instruct players to finish with their weaker foot.
Different types of finishing - Instead of shooting after the cone weave, the player passes the ball to a teammate on the end line, who then throws the ball up for a header or volley.
Competition - Create a competition to see who scores the most goals after three attempts.
Coaching points:
Players are likely to be somewhat flustered by the time they get through the dribble weave so instruct players to slow down, take a breath, and finish calmly.
This drill doesn’t have to be fast. Rather, it should be smooth. Pass this message to the players to help keep them relaxed and calm.
The drill replicates situations your players will face in a game so make sure passes are crisp and accurate.
8. Split the Defense
How the Drill Works:
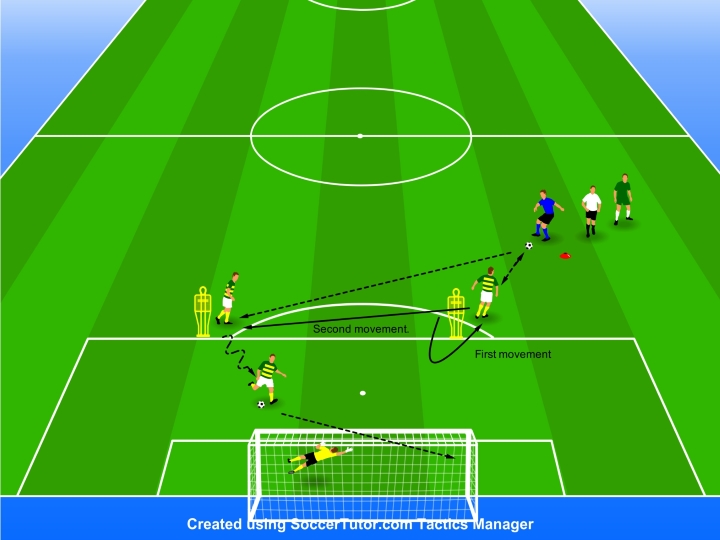
The striker makes a fake run toward the goal on the edge of the box before cutting back to receive a pass from the midfielder. After playing a quick one-two (to draw out a defender), the striker backpedals until they’re between the two center backs (mannequins). The midfielder plays a pass to the feet of the striker, who takes a touch between the defenders and finishes.
Purpose:
This drill teaches a simple but highly effective way for strikers to split the center backs and create an opening in front of goal, even when the field is congested.
Setup:
Use the penalty box and surrounding space for this drill.
Set up a full-size goal regardless of whether or not you have a goalkeeper.
Place a mannequin on the edge of the box near the center.
Put another mannequin on the edge of the box closer to the corner. There should be around 10 yards between the mannequins.
Place one cone around five yards outside the penalty box to mark the starting point of the passer.
The shooter stands next to the center mannequin at the beginning.
The passer and the rest of the team line up behind the cone.
Instructions:
On the coach’s whistle, the drill goes live.
The striker moves around the mannequin as if it were a defender.
Then, the striker fakes a run in behind, before checking it and running in front of the mannequin to receive a pass.
The passer plays a ball to the feet of a striker who hits a quick return pass.
After playing the one-two, the striker backpedals toward the second mannequin, simulating splitting the two center backs.
The passer then plays another pass to the feet of the striker who takes a good first touch toward the goal.
The striker then has a 1v1 on goal.
When the round is over, the passer becomes the striker and the striker joins the end of the passing line.
Variations:
Opposite side - Repeat the drill from the opposite side and focus on finishing and taking touches with the other feet.
Use real defenders - Once your players are comfortable with the drill, consider putting in real defenders instead of mannequins to simulate a real game.
Competition - Create a sudden death competition where everyone gets two lives. After each miss, players lose a life. The last remaining player wins.
Coaching points:
Movement is the most important aspect of this drill. Smooth and fast movement will help your players evade the defenders and create space where there appears to be none. Focus on this above all else.
The second priority is time so as your players improve, encourage them to work quicker.
The third priority is execution. All passes and touches are key so pay attention to all the technical aspects of the drill.
Looking for Even More Soccer Drills?
We've put together a complete blog post with links to all 123 soccer drills that are published on the Soccer Coaching Pro website -- absolutely free.
Or, you can jump strait to my shooting drills page for similar content.

